![[Pandas] 데이터프레임도 이미지로 저장할 수 있다구?](https://img1.daumcdn.net/thumb/R750x0/?scode=mtistory2&fname=https%3A%2F%2Fblog.kakaocdn.net%2Fdn%2FIeyHv%2FbtrNyEChk5v%2F7SXQ7hGKKOWXkpmQoa1NXk%2Fimg.png)

핵심내용
1.Pandas에서 데이터프레임을 이미지로 저장하는 방법에 대해서 정리해봅니다.
2.한글과 관련된 이슈를 해결해봅니다.
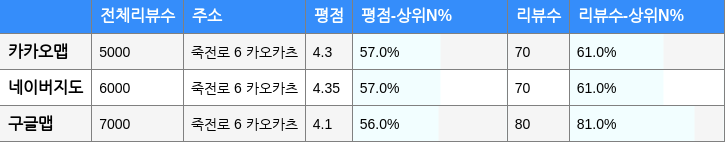
3.약간의 pandas style을 붙여봅니다.
1~3의 과정을 통해 위와 같은 이미지를 telegram 챗봇으로 보내봅시다.
(데이터야놀자 발표를 준비 하는 중에 관련된 내용을 글로 정리하였습니다.)
1.Pandas 데이터프레임을 PNG로 저장하는 방법들
Pandas에서 데이터프레임을 PNG로 저장하는 방법에는 크게 3가지가 있다.
(적어도 지금까지 내가 알아본 바로는)
1-1. dataframe-image라이브러리 이용하기
https://pypi.org/project/dataframe-image/
dataframe-image
Embed pandas DataFrames as images in pdf and markdown files when converting from Jupyter Notebooks
pypi.org
사용 전 한 가지 주의사항이 있다. jupyter notebook에서 dataframe-image를 그냥 사용하게 되면 아래와 같은 에러가 발생하는데, 이때는 nbconvert 버젼을 업그레이드하여 설치해주면 된다.
dataframe_image cannot import name 'contextfilter' from 'jinja2'
pip install nbconvert==6.4.3https://github.com/jupyter/nbconvert/issues/1742
Getting Error when running nbconvert command : ImportError: cannot import name 'contextfilter' from 'jinja2' · Issue #1742 ·
When running nbconvert command getting below error : Stack Trace: Traceback (most recent call last): File "/usr/local/bin/jupyter-nbconvert", line 5, in from nbconvert.nbconvertapp import...
github.com
첫 번째로 dataframe-image 라이브러리를 이용하는 방법이 있다.
import dataframe_image as dfi
dfi.export(dataframe, 'df.png')
dataframe_image 라이브러리의 장점 중 하나는 pandas style을 그대로 받아올 수 있다는 것이다. 아마, 데이터프레임을 따로 이미지로 받으려고 할 정도의 사용자면 그냥 내보내기 보다는 좀 더 꾸며서 내보내려고 했을 것이고 그렇다면, Pandas style을 같이 찾아봤을 것이기 때문이다.
https://pandas.pydata.org/docs/user_guide/style.html
Table Visualization — pandas 1.5.0 documentation
Some styling functions are common enough that we’ve “built them in” to the Styler, so you don’t have to write them and apply them yourself. The current list of such functions is: The individual documentation on each function often gives more exampl
pandas.pydata.org
판다스 스타일은 아래와 같이 판다스 데이터프레임을 꾸며주는 메서드이다.
본 글에서는 사용법에 대해서 다루지는 않을 것이기에 관련된 링크들만 남겨둔다.
https://pandas.pydata.org/docs/reference/api/pandas.io.formats.style.Styler.bar.html
https://coderzcolumn.com/tutorials/python/simple-guide-to-style-display-of-pandas-dataframes
어쨌든, dataframe_image 라이브러리를 사용하면 pandas style 객체를 그대로 받아올 수 있다. 이 외에도 dataframe_image라이브러리는 쥬피터 노트북 → PDF 변환도 지원하므로 한번쯤 사용해보면 좋을 것 같다.
1-2. Plotly - wirte_image
다음으로, Plotly의 write_image 메서드를 쓰는 방법이 있다.
How to save the Pandas dataframe/series data as a figure?
It sounds somewhat weird, but I need to save the Pandas console output string to png pics. For example: >>> df sales net_pft ROE ROIC STK_ID RPT_Date ...
stackoverflow.com
자세한 내용은 위 스택오버플로우 글을 참조하면 될 것 같다. 다만, 한 가지 주의사항이 있다. 바로, plotly를 5.3.1 버젼으로 설치해야 한다는 것이다. 그렇지 않으면 아래와 같은 에러가 발생한다.
Image export using the "kaleido" engine requires the kaleido package
pip install plotly==5.3.1plotly를 기본으로 설치하면 5.1.0버젼이 설치되기 때문에 위와 같이 명시적으로 버젼을 선언해주어야 한다.
그리고, 한 가지 단점은 plotly 문법을 어느정도 알아야 커스터마이징이 가능하다는 것. 물론, plotly에 익숙하신 분들이라면 개인적으로 write_image가 좀 더 이쁜 이미지를 뽑아주는 것 같다.
import plotly.figure_factory as ff
import pandas as pd

df = pd.DataFrame()
df['date'] = ['휴일하루만', '더주라', '많이안바람']
df['calories'] = [2200, 2100, 1500]
df['sleep hours'] = [8, 7.5, 8.2]
df['gym'] = [True, False, False]

fig =  ff.create_table(df)
fig.update_layout(
    autosize=False,
    width=500,
    height=200,
    font=dict({'family':'NanumGothic.ttf'})
)

# scale은 해상도와 관련된 변수이다.
fig.write_image("table_plotly2.png", scale=2)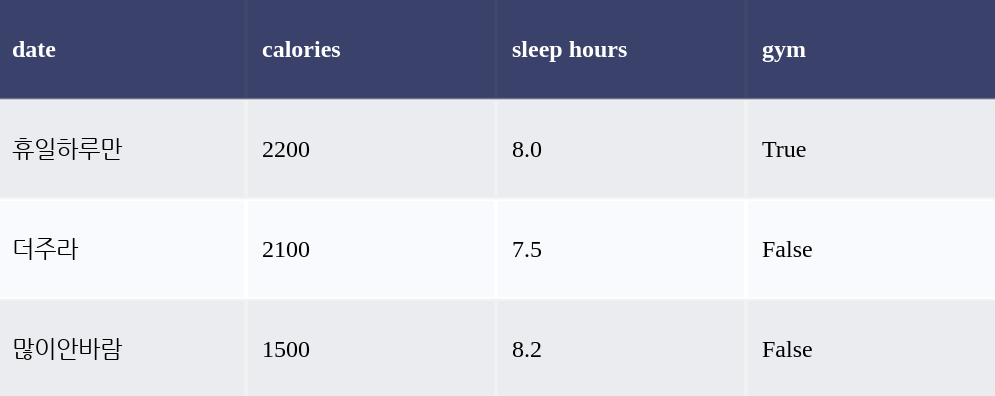
1-3. imgkit
다음으로, imgkit을 이용하는 방법이 있다. DataFrame을 html 문자열 형식으로 받아서 이미지로 만들어주는 방식인데 결과물이 별로 안예쁘다. 다른 목적이면 몰라도 판다스 데이터프레임을 꾸며서 이미지로 내보낼 경우에는 비추한다.
Option for dataframe-image module (convert a styled DataFrame to image) that the creator stopped updating and supporting
Always the best answers here from the community and that the image is perfectly formatted, that perfectly fits the columns according to the data, without loss of quality, the use of dataframe-image...
stackoverflow.com
추가적으로, wkhtmltoimage 관련된 에러가 발생할 수 있다. 공홈 가이드에 따라 각 os에 맞는 패키지를 설치해주자.
sudo apt-get install wkhtmltopdfhttps://pypi.org/project/imgkit/
imgkit
Wkhtmltopdf python wrapper to convert html to image using the webkit rendering engine and qt
pypi.org
2.한글설정 관련
2-1. dataframe-image를 사용하는 경우
Matplotlib의 한글 설정 방식과 동일하다. ubuntu에서는 아래 페이지를 참고하여 설정하면 좋을 것 같다.
https://financedata.github.io/posts/matplotlib-hangul-for-ubuntu-linux.html
matplotlib + 한글 (Ubuntu Linux)
matplotlib 에서 한글 (Ubuntu Linux)
financedata.github.io
한 가지 신기한 점은 위와 같이 jupyter notebook안에서는 글꼴이 반영되지 않지만, 이미지로 저장하면 글꼴이 반영된다는 것이다.
2-2. plotly write_image를 사용하는 경우
import plotly.figure_factory as ff
import pandas as pd

df = pd.DataFrame()
df['date'] = ['휴일하루만', '더주라', '많이안바람']
df['calories'] = [2200, 2100, 1500]
df['sleep hours'] = [8, 7.5, 8.2]
df['gym'] = [True, False, False]

fig =  ff.create_table(df)
fig.update_layout(
    autosize=False,
    width=500,
    height=200,
    font=dict({'family':'NanumGothic.ttf'})
)

# scale은 해상도와 관련된 변수이다.
fig.write_image("table_plotly2.png", scale=2)
위 코드처럼 font항목을 지정해준다.
3. 약간의 Pandas Style을 붙여보기
import pandas as pd
import dataframe_image as dfi
values = [[5000, '죽전로 143번길 카오카츠', 4.3, 0.57, 70, 0.61],
[6000, '죽전로 143번길 카오카츠', 4.35, 0.57, 70, 0.61],
[7000, '죽전로 143번길 카오카츠', 4.1, 0.56, 80, 0.81]]
index = ['카카오맵', '네이버지도', '구글맵']
columns = ['전체리뷰수', '주소', '평점', '평점-상위N%', '리뷰수', '리뷰수-상위N%']
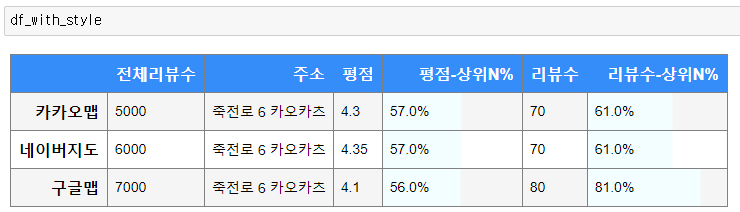
df_with_style = (sample_df.style.format({'평점-상위N%':'{:,.1%}'.format,
'리뷰수-상위N%':'{:,.1%}'.format,
'평점':'{:,.3}'.format,})
.set_properties(**{'text-align': 'left'})
.bar(subset=['평점-상위N%', '리뷰수-상위N%'], width=100, align='left', vmin=0, vmax=1, color='azure')
.set_table_styles(
[{"selector": "thead", "props": [("background-color", "dodgerblue"), ("color", "white")]},
{"selector": "tbody td", "props": [("border", "1px solid grey"), ('font-size', '14px')]},
{"selector": "th", "props": [("border", "1px solid grey"), ('font-size', '16px')]}]))
dfi.export(sample_df, 'test_image3.png')
판다스 style을 붙이고 나니 훨씬, 깔끔해졌다.자, 이제 심심한데 텔레그램 챗봇으로 이미지를 보내보자.
4. 챗봇으로 이미지 보내보기
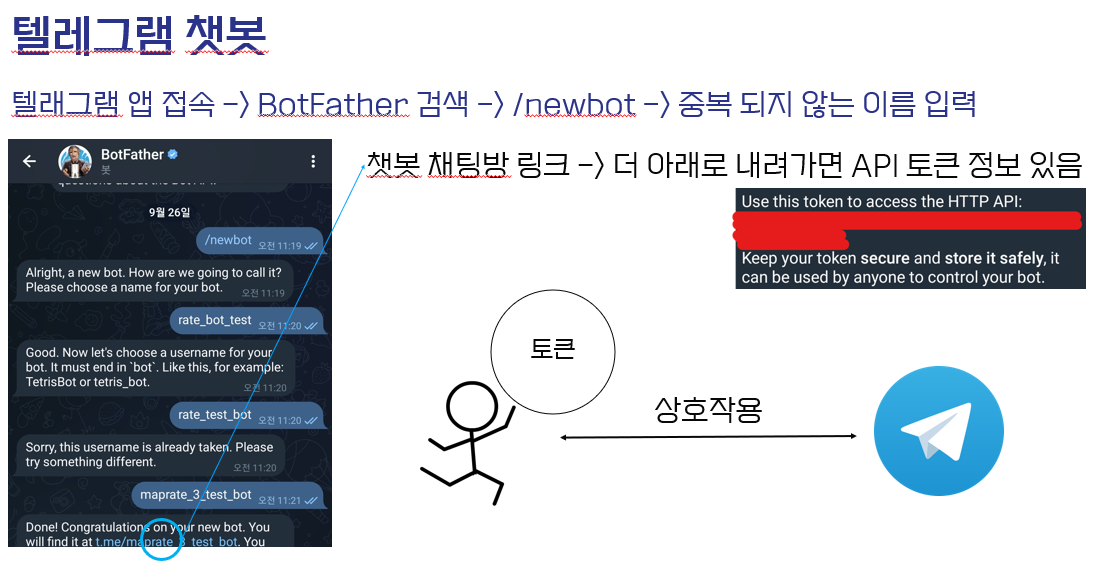
텔레그램 챗봇.. 진짜 만들기 쉽다. 그냥 BotFather 텔레그램 앱 내에서 검색하고 /newbot 호출한다음 봇이름 입력하고 API 키 저장하면 끝.
import telegram
token = '토큰 입력'
bot = telegram.Bot(token=token)
"""
# 챗봇 아이디 확인 _ 아래 메시지 안에 id가 있음
updates = bot.getUpdates()
for u in updates:
print(u.message)
"""
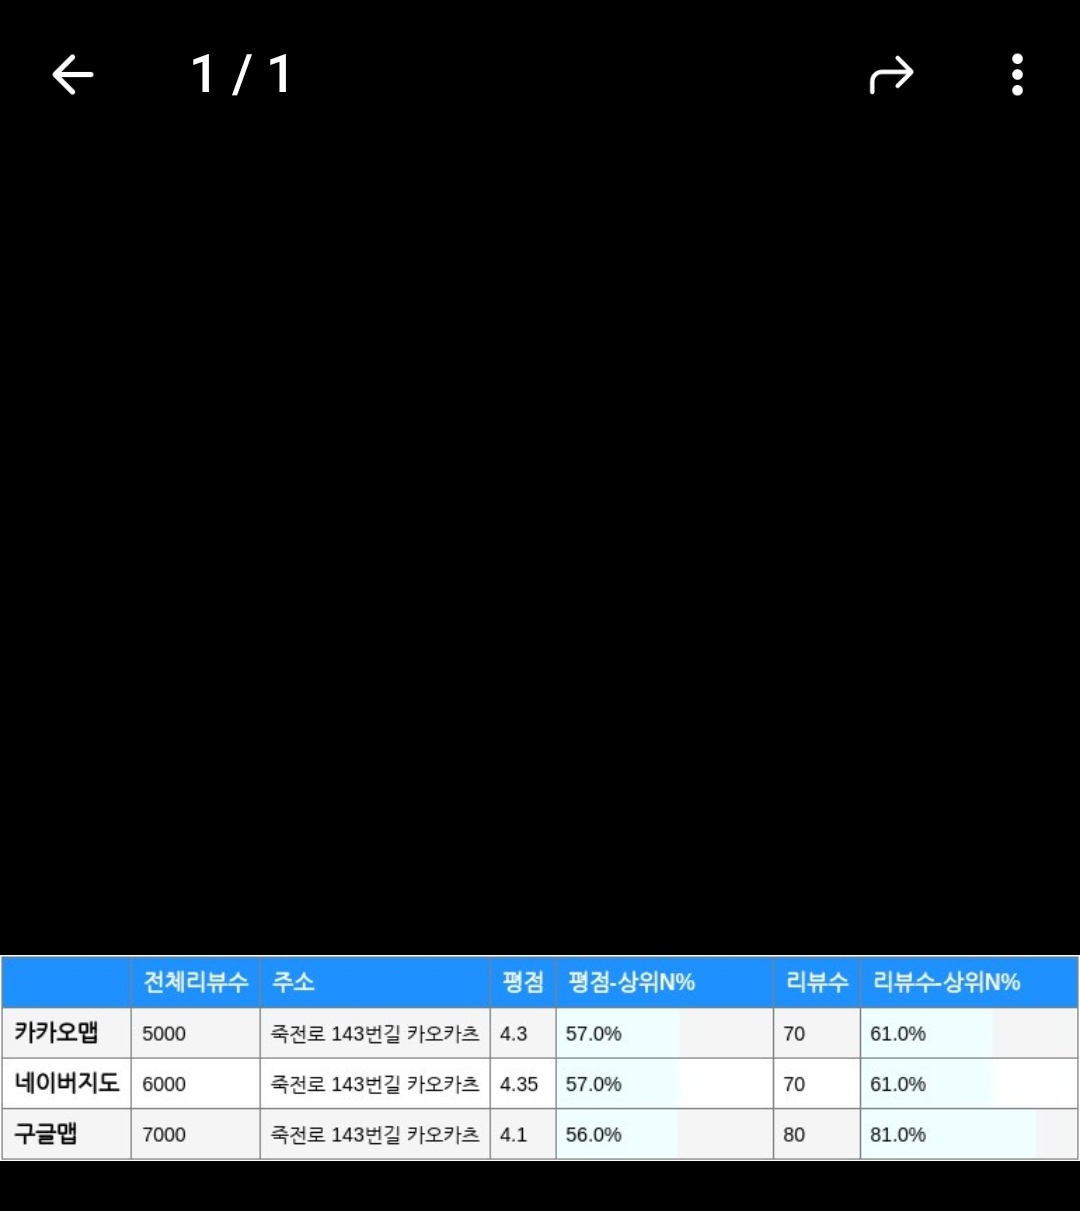
bot.send_photo(chat_id=챗봇 아이디, photo=open('test_image3.png', 'rb'))위와 같이 간단한 명령어로 챗봇에 이미지를 보낼 수 있다.
잘 전송된 것 같다.
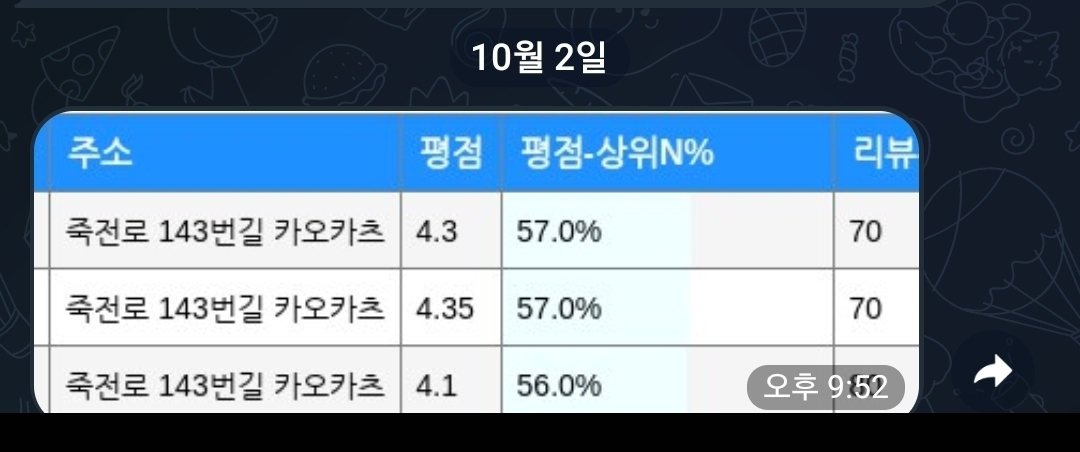
확대했을때.
'딥상어동의 딥한 데이터 처리 > 시각화' 카테고리의 다른 글
| 분당선 정자역에서 생각해본 데이터 시각화의 단상 (0) | 2023.01.09 |
|---|---|
| [Boxplot] 박스플롯 이용시 주의사항 (2) | 2021.12.19 |
| [Pandas] 퍼널차트 데이터프레임으로 표현해보기 (2) | 2021.08.15 |
| Seaborn | countplot(기본 파라미터, x축 정렬하기, x축 라벨 회전) (0) | 2021.03.07 |
| [Matplotlib] 모두를 위한 Python시각화 - (1)Matplotlib.artist (2) | 2021.01.03 |
제 블로그에 와주셔서 감사합니다! 다들 오늘 하루도 좋은 일 있으시길~~
포스팅이 좋았다면 "좋아요❤️" 또는 "구독👍🏻" 해주세요!

![[Boxplot] 박스플롯 이용시 주의사항](https://img1.daumcdn.net/thumb/R750x0/?scode=mtistory2&fname=https%3A%2F%2Fblog.kakaocdn.net%2Fdn%2FehG3yj%2FbtrohUbtCFz%2Fcs7FexdtRhZ5gKexdHeMJ0%2Fimg.png)
![[Pandas] 퍼널차트 데이터프레임으로 표현해보기](https://img1.daumcdn.net/thumb/R750x0/?scode=mtistory2&fname=https%3A%2F%2Fblog.kakaocdn.net%2Fdn%2Fd4bGge%2Fbtrb6T4hpKK%2FVE6Zk7JYw7HgAZL1PSwlr0%2Fimg.jpg)
